Development process
Even if your WeWeb components are standard Vue components, they need to be loaded inside a specific context to be tested. The easiest way to test is to use the WeWeb Editor in development mode. Here is a description of the different steps to test and develop your component.
Initiate your directory
Compatibility note
weweb-cli requires Node.js version >=18.0.0. weweb.io use Vue 3
We provide a npm template to quickly start development.
For npm
shell
npm init @weweb/componentFor yarn
shell
yarn create @weweb/componentThen you have to follow the different prompt questions.
If you already know what you want, you can pass the component name and the type of component you want via additional command line options.
For example, if you want to create an element named my-element or a section named hero-section:
shell
# npm 6.x (use npm -v to know your version)
npm init @weweb/component my-element --type element
npm init @weweb/component hero-section --type section

# npm 7+, extra double-dash is needed (use npm -v to know your version)
npm init @weweb/component my-element -- --type element
npm init @weweb/component hero-section -- --type section

# yarn
yarn create @weweb/component my-element --type element
yarn create @weweb/component hero-section --type section
The directory will contain:
- a
srcdirectory with a file for your component (wwSection.vueorwwElement.vue). Available props and events are listed here - a
package.jsonwith two scripts for dev and build, andweweb/clias dependencies - a basic
README.md - a
ww-config.jsdescribing all the properties of your component. Learn more about it here
WARNING
You can add other dependencies if you need to. Be aware that all package.json will be merged in the final web-app and, if two components need the same dependencies, only the more recent one will be installed. This can lead to conflicts.
DANGER
You do not need vue as a dependency, as it will be already provided by the Editor or the application.
Install dependencies and start dev server
Go to the directory you just created, install dependencies and start a dev server.
For npm:
shell
# Install dependencies
npm install

# Start with default 8080 port
npm run serve

# Or give a port (usefull if you are developing several components)
npm run serve -- port=4040
For yarn:
shell
# Install dependencies
yarn

# Start with default 8080 port
yarn serve

# Or give a port (usefull if you are developing several components)
yarn serve -- port=4040
We use https to serve components. Your browser needs to authorize this.
Go to https://localhost:8080 (or the port you choose).
Click on Advanced Settings then on Continue to localhost
Chrome settings
If you do not see Advanced settings, type chrome://flags as a URL in your browser. Search for Allow invalid certificates for resources loaded from localhost and click Enable
Load your component inside weweb.io in dev mode
Go to your dashboard and open the Editor of one of your projects.
Click on the Dev tab, and then on "Open Dev Editor" 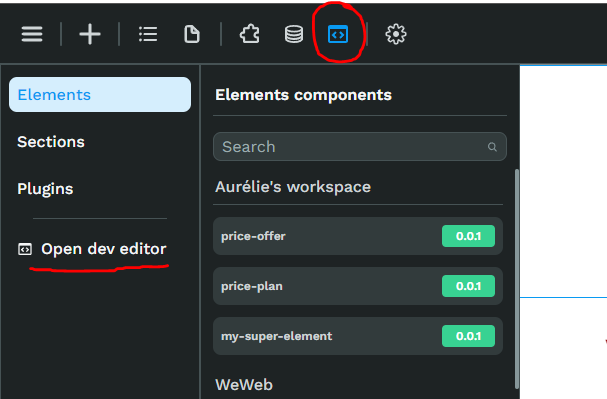
Editor dev
We use another version of the Editor to display your component while you are working on it. Because it requires a specific build of the Editor, you need to use this special version.
Open the dev tab again.
Select Element, Section or Plugin depending on your need.
Then click on Add local Element.
Give it a name and put the port where you start you dev server (8080 by default). If you did not do it before, you have a quick access to authorize the SSL certificate.
DANGER
Because during development you can broke the integrity of your component content, or use non existing yet components the autosave is disabled. This means that you can safely try things, but also that everything will be reloaded when refreshing the page.
Each time you change the code, the component will be refreshed inside the Editor.
Display and develop your component
You just have to drag-and-drop your component from the dev panel where you want to test it.
You can see the next section for more information about what you can do with your component
Push in production
When you are satisfied with your version, you can publish it. WeWeb relies on Github to version components.
We advise you to also clear the Local Development before moving to the next step (same panel as for adding one).
New component
If you are creating a new component, create a repository on Github and push your code.
Then go to your dashboard, and add a source code pointing to your Github repository.
Open the Editor (in normal mode, not dev), click on the Dev tab, and search on the bottom of the panel the source code of your component. Drag-and-drop it on the page.
If you'd like, you can also add some base style (padding, background color, some children, etc) and add it to your Design System.
TIP
This last step is not mandatory because you can always load your component from source code. But it offers a better user experience.
Updating existing component
If you are updating an existing component, update the version field in package.json and push to Github.
Then go to your Dashboard source code, search your component, and change the version (we have a hook on Github that will trigger a build each time you push to the pointed branch).
Check that everything is working as excepted.
TIP
Your component will not be updated inside your web-app until you change the active version in the dashboard.
And voilà!